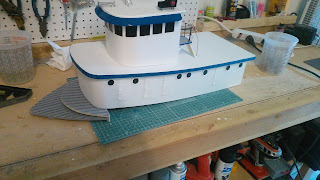
I had about 10 hours' time to work on my little boat while I was home. Not as much as I'd like, but I find it to be a better morning/early afternoon pastime, as that's pretty much the only time there is no real constraint on my time at home, and it keeps me from missing out on time with my family. Hopefully I'll have more time in the upcoming months, but who knows?
The little wooden rings will become portholes, and the blocks will become watertight doors. I simply glued little wedges of wood for the hinges, and then glued 1/4" nibs of plastic rod to the wedges to complete the look. Thankfully the rings were pre-cut and I just had to sand and smooth and paint them.
I attached the portholes with dressmakers' pins, which, when painted, will look like rivets, and glued them all, too, to firm everything up. I predrilled the holes with a 1/32" drill by hand so I wouldn't have to take a hammer to the wood.
Making the side ladders was a bitch. They're made from 1/16" round stock brass rod, cut to length and soldered together. After a couple hours of filing, they really looked nice, although this picture only shows them partially soldered together.
 | |||
| before |
Unfortunately, after priming and painting, I then bent the ends of the ladder to shape without adequately supporting the brass, and little ladder rungs went flying. Boy wasn't I pissed. I had to soak the parts in xylene and start resoldering. I ran out of time and only got one soldered before it was time to clean up and pack my bags for another trip.
 |
| ah, fuck. |
 |
| priming the deck and bulwarks |

 | ||
| upper house primed and trim completed. Portholes are painted and watertight doors installed. |
I topcoated the deck and lower house (I'm still not happy with the wheelhouse), as well as the fantail and bow raised platforms. The bulwarks and gunwales still have to get painted, and I'll do those in satin black to match the hull. The hatch you see in the main deck is still just roughed in place. That'll be a watertight access hatch to the motor, speed control and steering gear. There will be a motorcycle battery under the house, which comes off but is watertight when on.


My hands shake. Always have. Detail and fine work isn't always so easy for me, but I find that the focus and concentration and effort helps. Finding ways to prop my hands and rest them against something steadies them up considerably. All the same, I bet a person with steadier hands could work considerably faster and neater. By the time I'm done with this, I'll be able to do much better on the next one. Just figuring out how to repurpose everyday items to simulate boat parts is challenging enough on its' own.
Next time I'm home I'll be installing handrails on the lower house and railings and chains on the upper deck. Hopefully I'll get started on the davit for the lifeboat, too... and maybe the lifeboat, if there's time. That'll be a challenge in itself. The damn boat is getting big. It's 4 1/2 feet long, and takes up a fair amount of space. I've got a lot of detail work still to do.


5 comments:
That kind of model building is beyond me. It looks beautiful. Hey, do you remember the dimensions on your ladder? width of rails, distance between rungs? Seeing that unzipped made me think of a jig to hold them. I might be able to fabricobble something that would ease the work holding them together.....
Thanks! I don't remember the dimensions. There were only two ladders, so making a jig didn't cross my mind. Perhaps it should have. I about cried into my whisky when I broke all that hard work.
Did you contour the brass pieces where they touch? You need the parts to fit with as little gap as possible, to enhance the strength of a solder joint.
Hmmm, have you considered brazing the parts, instead? That would give you enough strength to fold, bend, and mutilate, and it may give you the joint profile you want without needing to file/sand/grind. A micro-torch should do for that small a joint.
Will- probably not as much as I should have. I just cut flush where joins were at 90 degrees and beveled a touch where I joined at an angle. The 1/16 I might could do better.
I wondered about brazing, but thought I could do better soldering. I think, knowing what I know now, I could do a better job this time. I'm going to have to learn how to do brazing properly at some point. I'm a hack.
In the early 80's, I took an electronics assembly course from a NASA certified instructor. He made the statement that the Apollo moonshots wouldn't have left the pad if every solder joint had an extra drop of solder. (you wouldn't think there was that much wiring on board the rocket and payload!)
A proper joint would appear to be nickle plated, so that every detail was clearly seen. No rounded surfaces (excess solder) were acceptable. No excess wire, either. Very rare to see that level of attention to solder. Takes too long for most applications to justify.
They determined that excess solder didn't add any significant strength to the joint, as the wire itself would quickly become the weak point of the mechanical connection.
Post a Comment